
Reviewed · PHOTOGRAPHY SESSIONS
Copenhagen City Of Lights PhotoWalks Tour
Copenhagen changes character as daylight fades. This private three-hour night photography walk takes you from Nyhavn toward the city’s most photogenic sights just as streetlights and building lights begin to glow. You’ll learn by shooting real landmarks, not by sitting through a classroom lecture.
I like the one-on-one instruction, since your guide can adjust the lesson to your camera and experience. I also like the chance to photograph Nyhavn, the Queens palace, the Opera House, Parliament, and other central sights in one focused outing. The main catch is timing: a 6 to 9 pm tour may still have plenty of daylight in Copenhagen during the long summer evenings.
Key points at a glance
- Photograph Nyhavn after dark: Capture the old waterfront houses and their reflections as the lights come on.
- Private group of up to four: Your guide can spend the full tour helping your party with settings and composition.
- Learn practical camera control: Work with aperture, shutter speed, ISO, exposure, and long shutter speeds.
- Bring a tripod: Longer exposures are a central part of the lesson, so this is not a point-and-shoot stroll.
- See major sights in evening light: The route includes the Queens palace, Opera House, Parliament, and other central landmarks.
- Expect all-weather walking: The tour runs in all weather, so clothing matters as much as camera gear.
Why Copenhagen Looks Better After Sunset
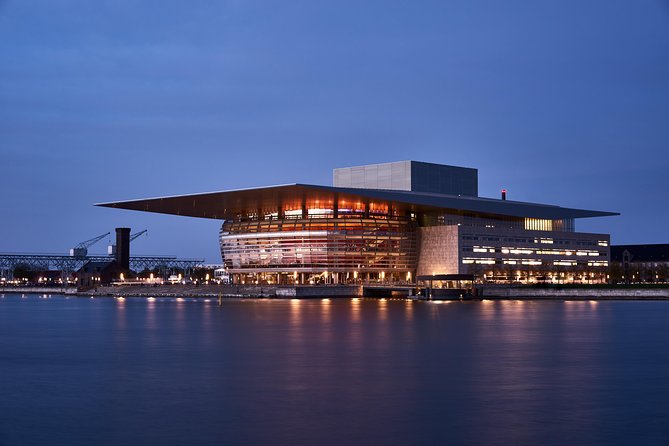
Copenhagen is easy to photograph by day, but the hours around sunset give its familiar sights a different mood. The soft period between daylight and full night, often called blue hour, can put a cool tone in the sky while warm lights begin to shine from windows, boats, streets, and public buildings.
That mix gives you more than a standard sightseeing picture. You can work with contrast between blue sky and yellow light, use reflections in the water, and frame the city with shadows and bright details. Your guide helps you spot those opportunities instead of simply pointing out landmarks.
The tour is designed around this change in light. It is not a general city walk with a few photo stops added on. You are moving through Copenhagen with the specific goal of making stronger night images and learning why certain camera choices work.
One practical issue deserves attention. Copenhagen’s summer sun can linger well past 9 pm. A tour scheduled from 6 to 9 pm may finish before true darkness, depending on the season. You can still photograph the valuable blue-hour period, but you should check the date and sunset time if your main goal is fully dark city scenes.
More photo shoots around Copenhagen:
- Photoshoot around Copenhagen’s Iconic Locations
★ 5.0 · 28 reviews - Instagram tour of Copenhagen with a private photographer
★ 4.9 · 12 reviews - Private Photography Portraits City Activity in Copenhagen
★ 5.0 · 12 reviews
Meeting at Nyhavn and Starting With the Right Frame
The meeting point is the Memorial Anchor at Nyhavn 1F, 1051 København. This places you beside one of Copenhagen’s most recognizable views from the very start, with the colorful old houses, canal, and lamps providing an immediate photography subject.
Nyhavn can be a busy visual scene. The rows of buildings, boats, water, signs, and people give you plenty to work with, but they can also make a frame feel cluttered. A private guide can help you choose an angle, simplify the composition, and decide what belongs at the edge of the picture.
This is where the instruction on perspective, lines, and color becomes useful. You might shoot down the canal to create depth, use the buildings as strong vertical lines, or place warm lights against the cooler evening sky. The goal is not simply to record that you were in Nyhavn. It is to make the picture feel orderly and intentional.
The guide also works with your camera settings. You can learn how aperture affects the amount of light and the look of bright points, how shutter speed changes movement and reflections, and how ISO affects exposure. The setting choices make more sense when you see the result immediately on your own camera.
The Blue-Hour Lesson: Aperture, Shutter Speed, and ISO
Night photography often feels difficult because the camera sees light differently than your eyes do. You may see a well-lit building clearly, while the camera struggles with dark areas and bright lamps in the same frame.
The guide helps you manage this contrast through manual settings. Aperture controls how much light enters and affects the look of the image. Shutter speed determines how long the camera records the scene, while ISO changes the sensor’s sensitivity to light. You are not just told what each control does. You get a chance to test the settings against real Copenhagen scenes.
Long shutter speeds are especially important here. They can smooth moving water, record more light, and create a calm look in a canal or harbor scene. They also make camera movement more obvious, which is why a tripod is required.
A tripod is not an optional extra for this experience. Bring one if you book. It gives the camera a stable platform for longer exposures and lets you use lower ISO settings in dark conditions. If you arrive without one, you will miss a major part of the lesson.
The guide can also discuss post-processing tips. The supplied information does not specify which editing program or software is used, so you should think of this as general advice about improving night images rather than a dedicated editing class.
From Nyhavn to the Queens Palace
The route continues to other important sights in central Copenhagen, including the Queens palace. Palace architecture can be a strong night subject because lighting often emphasizes symmetry, entrances, windows, and broad facades.
This stop gives you a chance to apply a different style of composition. Nyhavn is narrow, colorful, and full of layers. A palace view can feel more formal and balanced. You may work with centered lines, repeated shapes, and the relationship between the building and the open space around it.
Your guide’s artistic judgment matters here. The strongest angle is not always the most obvious one, especially when a building is large and evenly lit. A professional photography guide can help you look for framing, leading lines, and a clean arrangement of bright and dark areas.
The private format is particularly useful at this stage. You can ask why one exposure works better than another, or stop to repeat a shot without holding up a larger group. If you already know your camera, the guide can focus less on basic controls and more on composition and visual choices.
A few more Copenhagen half-days to weigh up
- Copenhagen: Canal Cruise with Guide
★ 4.6 · 9,115 reviews - Copenhagen: Hop-On Hop-Off Bus Tour with Boat Tour Option
★ 3.9 · 4,122 reviews - Private Walking Grand Tour of Copenhagen
★ 5.0 · 3,953 reviews - From Copenhagen: Lund and Malmö 2-Country Tour
★ 4.7 · 2,772 reviews
The Opera House and Parliament by Evening Light
The Opera House is another major subject on the route. Its modern form offers a change from the older buildings around Nyhavn and the palace. Different architecture calls for different framing, so this is a good point to test how lines, scale, and perspective affect a photograph.
Parliament adds another architectural subject, with a more formal civic character. Along with other central landmarks, these stops help turn the walk into a varied photography lesson rather than a single-location shoot.
You should expect the route to be shaped by the light and your group’s photographic needs. The guide can tailor the experience to your interests, but the available information does not give a fixed list of every stop or the exact walking order. The named sights are clear, while the smaller stops can change according to conditions and your goals.
This flexibility is one of the better reasons to choose a private tour. A beginner may need more time to understand exposure. Someone with more experience may want help with a difficult composition or a particular long-exposure effect. The guide can concentrate on the issue that matters most to you.
What the Private Format Is Worth at $233.63
The price is $233.63 per person, which is high compared with a standard group sightseeing walk. The value depends heavily on how many people share the booking and how much you want the photography instruction.
The tour is private, and up to three friends or family members can join you within the booking. That makes the price easier to judge as a group cost rather than a solo photography lesson. Four people splitting the experience would pay for focused guidance while also enjoying a shared evening activity.
The private format also saves you from paying for a lesson that moves at the wrong pace. Beginners can ask basic questions without feeling rushed. More experienced photographers can skip explanations they already understand and concentrate on composition, exposure, or night shooting technique.
I would not choose this tour simply to see Copenhagen’s landmarks. You can see the same central sights through an ordinary walk for less money. I would choose it if you want to improve your camera work and come away with photographs made under changing evening light.
The value is strongest for people who already own a camera with manual controls and want practical help using it. It is less compelling if you only plan to take quick phone snapshots, since the tour requires a tripod and centers on longer exposures.
A Patient Guide Matters More Than a Fixed Route
Photography instruction can become frustrating when the guide rushes from one sight to the next. Here, the private setup allows the guide to focus on your camera, your questions, and the images you are trying to make.
The only direct feedback supplied about the guide highlights patience and a strong artistic eye, particularly when helping with camera use and finding interesting shots. That is important. Night photography involves trial and error, and a good instructor needs to explain a setting, let you test it, and help you understand the result.
No guide name is provided, so you should not book expecting a particular named instructor. You can expect a professional photographer guide, with the main benefit being individual attention rather than a specific personality or presenter.
The tour suits a range of skill levels. Beginners can learn manual settings and the basics of light control. Experienced photographers can refine perspective, lines, color, and long-exposure choices. The guide’s role is to help you become more confident with the equipment you already have.
Weather, Walking, and What to Carry
The tour operates in all weather conditions. Dress for the forecast and bring clothing that will keep you comfortable while standing outside and walking between sights. A wet or windy evening can affect how long you want to spend adjusting a tripod, so practical clothing is part of the preparation.
Your essential item is a tripod. You should also bring the camera you want to learn on, since the lesson focuses on your own equipment and settings. The provided details do not specify a recommended lens, battery policy, or storage requirements, so those choices remain up to you.
The route is near public transportation, and the activity starts at Nyhavn. It ends back at the meeting point, close to the Kongens Nytorv Metro station. That makes the location fairly practical for getting to and from the walk.
Most people can take part, but remember that this is a walking photography outing, not a seated lesson. You will be carrying your camera and tripod and stopping repeatedly to compose and adjust exposures.
Who Will Get the Most From This Walk
I would recommend the tour to a photographer who wants direct help in real city conditions. You will learn more by photographing lit buildings and moving water than by reading a list of settings in a hotel room.
It is also a good match for couples, families, or a small group of friends who want one shared activity. The private format means the guide can help each person, though a group with very different skill levels may need to divide attention at times.
Beginners should not be put off by the manual settings. The guide is there to help with aperture, shutter speed, ISO, composition, and exposure. Still, you should bring a camera that allows this level of control. A tripod is required, so this is not a casual walk for a phone-only visitor.
Experienced photographers may appreciate the artistic side more than the basic instruction. The guide can help you find fresh angles on familiar sights and use light, color, lines, and perspective with more purpose.
Cancellation and Booking Details
You receive confirmation at booking, and the activity is offered in English with a mobile ticket. Free cancellation is available if you cancel at least 24 hours before the start time. Cancellations or changes made less than 24 hours in advance are not refunded or accepted.
The tour has a rating of 4.8 from five reviews, but the small number means you should treat that figure as a limited guide rather than a complete picture. The strongest practical praise centers on the guide’s patience and artistic eye.
Should You Book the Copenhagen City of Lights PhotoWalks Tour?
Book this if you want a private photography lesson wrapped around Copenhagen sightseeing. The best reasons are the personal coaching, the chance to work through manual settings on location, and the variety of evening subjects from Nyhavn to the palace, Opera House, and Parliament.
Think carefully about the timing if you are visiting in summer. A 6 to 9 pm schedule may overlap with sunset and blue hour rather than full darkness. That can produce excellent images, but it may not match your idea of night photography.
At $233.63 per person, the tour is a serious purchase. It makes the most sense for a group of up to four people who will share the private experience, or for a photographer who values tailored instruction more than a low-cost city walk. Bring a tripod, accept the weather risk, and book when the light fits your goal.
FAQ
Where does the Copenhagen City of Lights PhotoWalks Tour start?
The tour starts at the Memorial Anchor, Nyhavn 1F, 1051 København, Denmark.
Where does the tour end?
The activity ends back at the meeting point, close to the Kongens Nytorv Metro station.
How long does the photography tour last?
The tour lasts approximately three hours.
Is the tour private?
Yes. Only your group participates, and you can bring up to three friends or family members within the booking.
What language is the tour offered in?
The tour is offered in English.
Do I need to bring a tripod?
Yes. A tripod is required because the tour includes longer exposures for night scenes.
What will I learn during the experience?
You will learn about manual aperture, shutter speed, ISO, exposure, composition, perspective, lines, color, light control, long shutter speeds, and post-processing tips.
What is the cancellation policy?
You can cancel at least 24 hours before the experience for a full refund. Cancellations or changes made less than 24 hours before the start time are not accepted or refunded.
Just added around Copenhagen
- Copenhagen Walking Tour with Food Testing (smorrebrod dish & snap)★ 4.5 · 10 reviews
- a day at North Zealand Castle Tour★ 4.5 · 19 reviews
- walking tour – Copenhagen and Christiansborg 3 hours★ 4.0 · 7 reviews
- Small Group Guided Food Tour and Street Art Visit to Norrebro★ 5.0 · 9 reviews
- The Philosopher’s Last Walk: An audio tour on the life of Søren Kierkegaard★ 4.5 · 5 reviews
- The Six Forgotten Giants Trolls Hunt with Minibus★ 4.5 · 27 reviews
- The Foodie Tour of Copenhagen★ 5.0 · 14 reviews
- The Forgotten Giants Private Tour★ 5.0 · 3 reviews
Photography Sessions, compared.
Photoshoot around Copenhagen’s Iconic Locations
Read our review →
Instagram tour of Copenhagen with a private photographer
Read our review →
Private Photography Portraits City Activity in Copenhagen
Read our review →
Browse the lists this tour appears in